Settings › Windows Update › Update settingsPause Windows Updates for a Convenient Time: A Quick Guide
Windows updates are crucial for keeping your system secure, stable, and equipped with the latest features. However, there are moments when an automatic update or a sudden restart prompt can be highly disruptive—perhaps during an important presentation, a critical work deadline, or when you have limited internet bandwidth. Fortunately, Windows provides an easy way to pause updates for a convenient time [on your] Windows PC, giving you temporary control over when these installations occur.
- Open Settings > Windows Update, then use Pause updates and pick a duration.
- You can pause updates for up to 35 days (5 weeks), and they resume automatically when the selected pause duration expires.
- To resume sooner, return to Windows Update and click Resume updates.
This guide will walk you through the simple steps to temporarily halt Windows updates, ensuring they don’t interfere when you least expect them.
Why Would You Want to Pause Windows Updates?
While keeping your system updated is paramount for security, there are legitimate reasons why you might need to pause them temporarily:
- Avoid Interruptions: Prevent updates and restarts during crucial work, gaming sessions, or presentations.
- Manage Bandwidth: If you’re on a metered or slow internet connection, pausing updates can prevent large downloads from consuming your available bandwidth at an inconvenient moment.
- Prevent Unexpected Restarts: Ensure your PC doesn’t automatically restart when you need it to stay on.
- Temporary Stability Concerns: If you’ve heard reports of a recent update causing issues for some users, you might choose to pause updates briefly to see if a revised version is released.
How to Pause Updates for a Convenient Time in Windows (10 & 11)
The process to pause updates for a convenient time [in] Windows is straightforward and primarily handled through the Settings app.
-
Open the Settings App:
- Click the Start button.
- Select the Settings icon (it looks like a gear ⚙️).
- Alternatively, press the
Windows Key + Ion your keyboard.
-
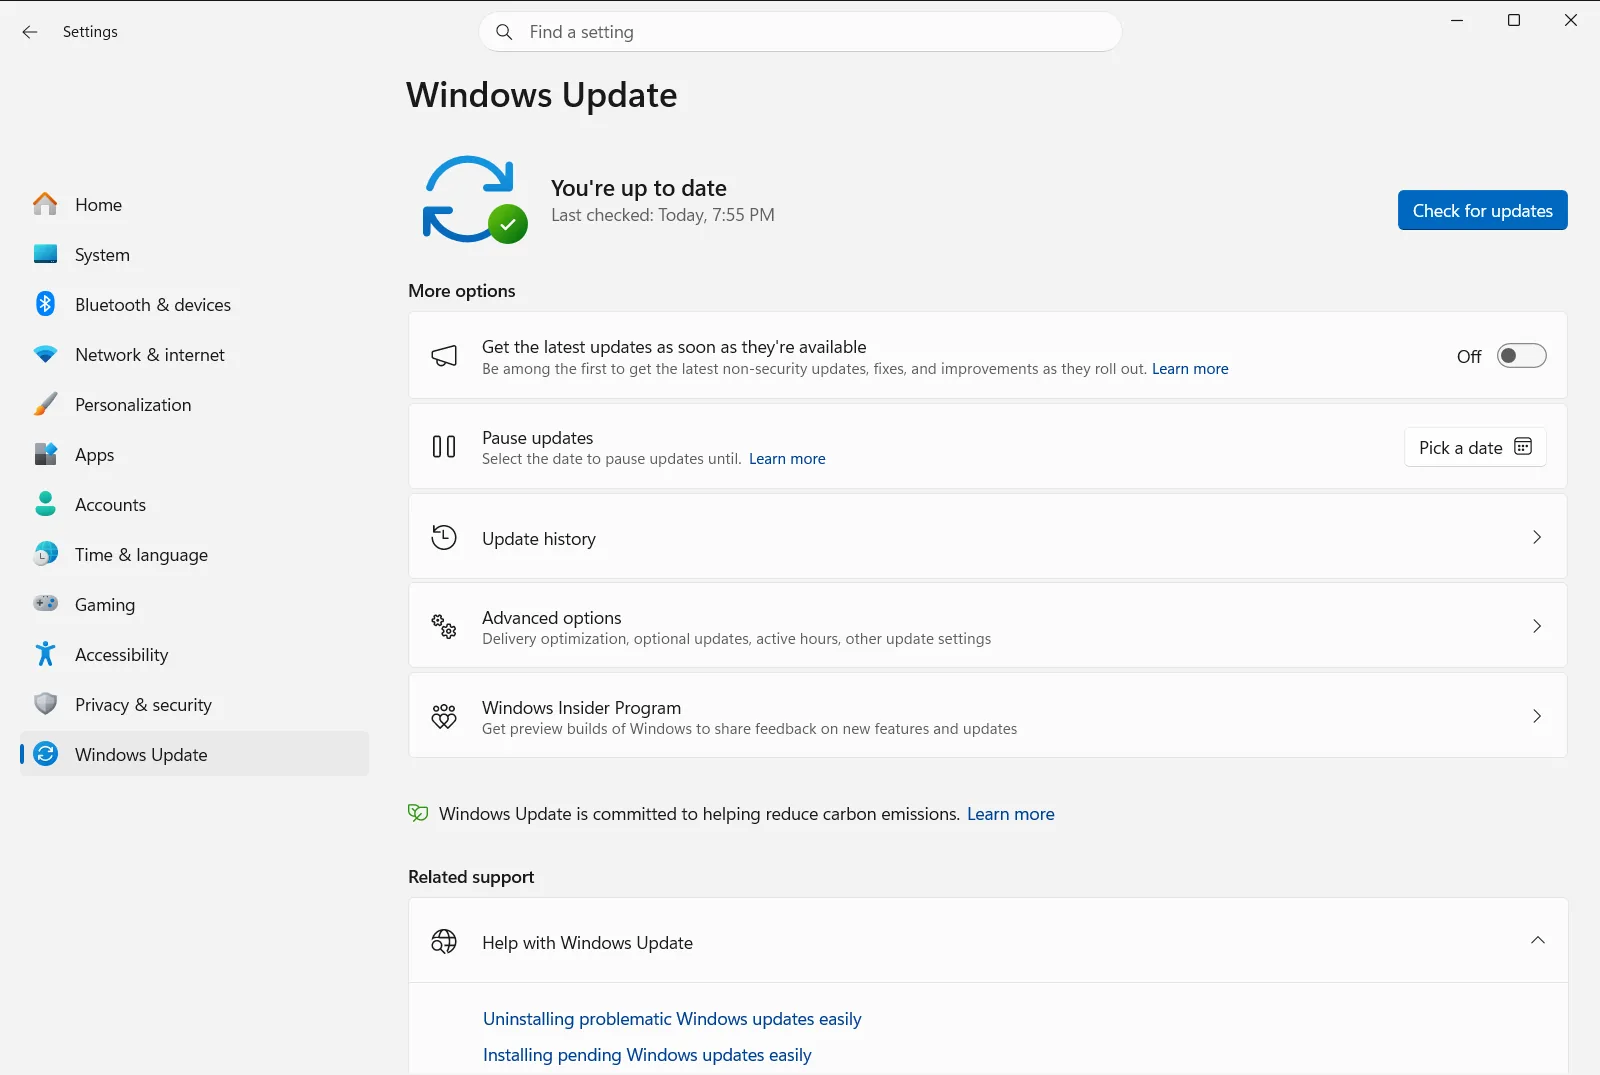
Navigate to Windows Update:
- In Windows 11: Select Windows Update from the left-hand sidebar menu.
- In Windows 10: Click on Update & Security, and then ensure Windows Update is selected from the left-hand sidebar.
Open "Windows Update" in Settingsor press Win+R, type
ms-settings:windowsupdate, and press Enter
-
Choose Your Pause Duration:
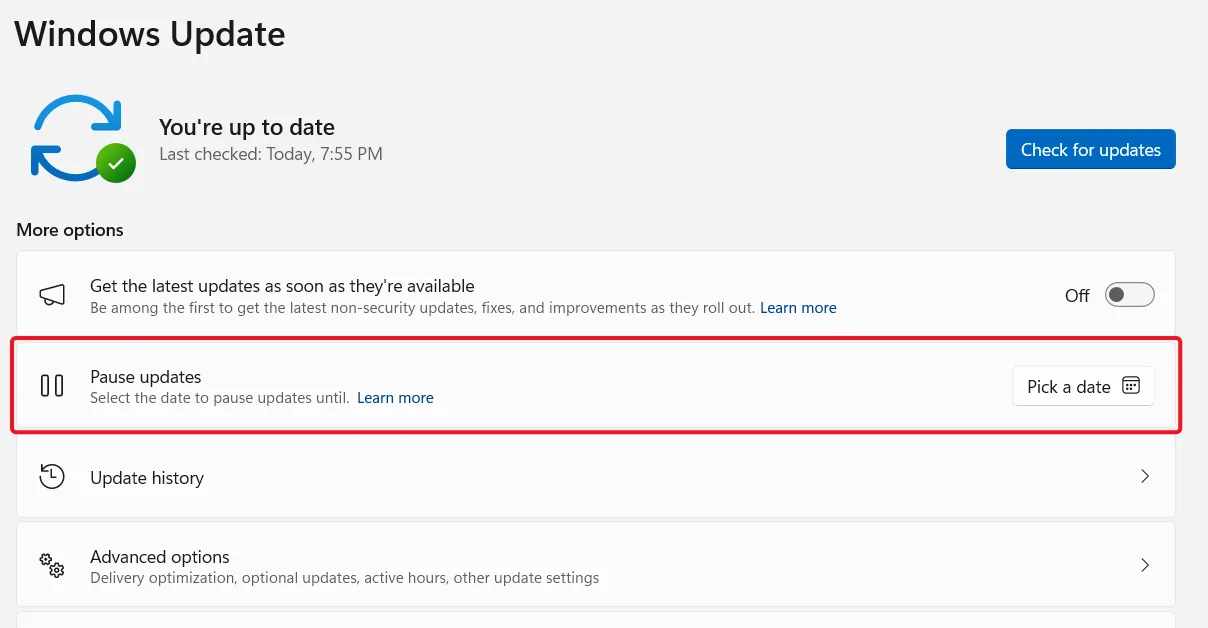
- On the Windows Update page, you will see options related to pausing updates. Look for a button or a dropdown menu typically labeled Pause updates.
- You can usually select a specific duration to pause updates, often in one-week increments, up to a maximum of 35 days (5 weeks). Click the dropdown and select the period that is a convenient time for you (e.g., “Pause for 1 week”, “Pause for 2 weeks”, etc.).
- Once you select a duration, Windows will confirm that updates are paused and will show the date when updates will automatically resume.

What Happens When Updates Are Paused?
During the pause period, your computer will not download or install any new Windows updates, including security updates, feature updates, and driver updates delivered through Windows Update.
Resuming Updates Manually
If your convenient time ends sooner than expected, or you simply decide you’re ready to update, you can easily resume updates:
- Return to the Windows Update settings page (Settings > Windows Update).
- Click the Resume updates button.
- Windows will then check for, download, and install any available updates. Note that you usually need to install all currently available updates before you can pause them again.
Important Considerations When Pausing Updates:
- Security Risk: Remember that pausing updates means your PC won’t receive the latest security patches. This should be a temporary measure. Don’t leave updates paused indefinitely.
- Essential Maintenance: Updates aren’t just about new features; they fix bugs and improve system stability.
- Automatic Resumption: Updates will automatically resume once your selected pause duration expires.
Conclusion
Knowing how to pause updates for a convenient time [on your] Windows system gives you valuable flexibility in managing your PC. It allows you to maintain productivity and control without completely forgoing the essential benefits of regular updates. Use this feature wisely to balance convenience with the ongoing need for a secure and up-to-date operating system. Once your critical tasks are complete, remember to allow updates to resume to keep your Windows environment protected.
Frequently asked questions
Pause updates for a convenient time windows: how do I do it?
Open Settings, select Windows Update, then use Pause updates and choose a duration of up to 35 days. Updates resume automatically once the selected pause duration expires, or you can click Resume updates sooner.
How long can I pause Windows updates?
You can usually pause updates for up to 35 days (5 weeks), typically in one-week increments. Updates then resume automatically once the selected pause duration expires.
What happens while updates are paused?
Your computer will not download or install new Windows updates, including security, feature and driver updates delivered through Windows Update. Updates resume automatically when the pause ends.
How do I resume paused updates before the pause ends?
Return to the Windows Update page and click Resume updates. Windows then checks for, downloads and installs available updates. You usually need to install them all before pausing again.
Why would I want to pause Windows updates?
To avoid interruptions and unexpected restarts during work, gaming or presentations, to manage bandwidth on a metered or slow connection, or to wait for a revised version after reports of a problem update.
Official Microsoft documentation
