Connect a Wireless Printer Easily in Windows: A Step-by-Step Guide
Wireless printers offer incredible convenience, allowing you to print from anywhere in your home or office without being tethered by cables. Setting one up on your Windows PC might seem daunting, but it’s usually a straightforward process. This guide will show you how to Connect a wireless printer easily windows, covering the essential steps for both Windows 10 and Windows 11.
Why Use a Wireless Printer?
The benefits of a wireless printer extend beyond just eliminating a USB cable.
Convenience and Flexibility
Print from your laptop, desktop, or even mobile devices from any room within your Wi-Fi network’s range.
Reduced Cable Clutter
A cleaner, more organized workspace with fewer cables running покупателями your desk and PC.
Easy Sharing
Multiple users on the same network can easily connect to and use a single wireless printer without needing to physically connect their devices or set up complex sharing configurations.
Before You Begin: Prerequisites
Before attempting to connect your wireless printer, ensure you have the following 준비:
Printer is Powered On and in Setup Mode (if applicable)
Make sure your printer is turned on. For new printers, or if you’re connecting it to a new network, it might need to be in a specific “setup” or “pairing” mode. Refer to your printer’s manual for instructions.
Know Your Wi-Fi Network Name (SSID) and Password
You’ll need this information to connect the printer to your wireless network. Ensure your printer supports your Wi-Fi network’s security protocol (e.g., WPA2, WPA3).
Ensure Your Windows PC is Connected to the Same Wi-Fi Network
For the easiest setup, your Windows computer should be connected to the same Wi-Fi network that you intend to connect your printer to.
Install Printer Drivers (Sometimes Optional, Sometimes Necessary)
Windows often automatically detects and installs basic drivers for many printers. However, for full functionality or if Windows can’t find the printer, you might need to download and install the latest drivers from the printer manufacturer’s website.
How to Connect a Wireless Printer Easily in Windows (Windows 10 & 11)
The primary method for adding a wireless printer is through Windows Settings. The steps are very similar for Windows 10 and Windows 11.
Method 1: Using Windows Settings (Recommended)
- Turn on your printer and ensure it’s connected to your Wi-Fi network. Many modern printers have a built-in Wi-Fi setup wizard on their display panel. If your printer doesn’t have a display, you might need to use a temporary USB connection to configure its Wi-Fi settings via software provided by the manufacturer, or use a WPS (Wi-Fi Protected Setup) button if both your router and printer support it.
- On your Windows PC, click the Start button.
- Select Settings (the gear icon ⚙️).
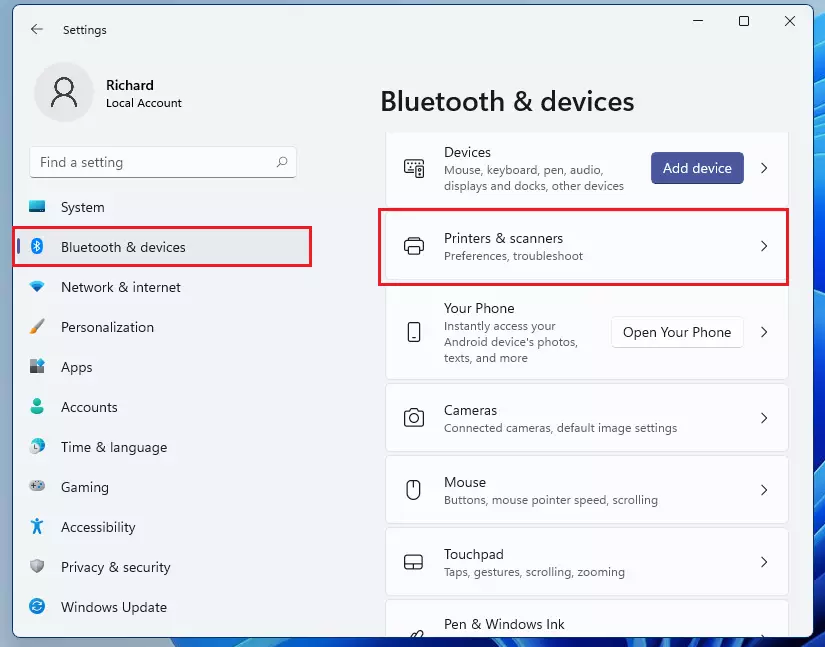
- In the Settings window:
- For Windows 11: Click on “Bluetooth & devices” in the left-hand pane, then select “Printers & scanners”.
- For Windows 10: Click on “Devices”, then select “Printers & scanners” from the left-hand pane.
- Click the “Add a printer or scanner” button (Windows 10) or “Add device” button next to “Printers & scanners” (Windows 11).
- Windows will now search for available printers on your network. If your printer is correctly connected to the Wi-Fi and discoverable, it should appear in the list.
- Select your printer from the list and click “Add device” (Windows 11) or follow the on-screen prompts (Windows 10). Windows will attempt to install the necessary drivers.
- If Windows prompts you to install drivers, follow the instructions. It might download them automatically or ask you to locate them.
- Once added, you can print a test page to ensure everything is working correctly.
Method 2: Using the Printer Manufacturer’s Software
Most printer manufacturers provide their own setup software or utility, often downloadable from their website. This software can sometimes offer a more guided setup process, especially for configuring Wi-Fi on printers without a display.
- Visit your printer manufacturer’s support website.
- Search for your printer model.
- Download the recommended setup software or full driver package.
- Run the downloaded installer and follow the on-screen instructions. This will usually include steps to connect the printer to your Wi-Fi network and install the drivers on your PC.
What if Windows Doesn’t Find Your Printer?
If Windows doesn’t automatically detect your printer after clicking “Add a printer or scanner” / “Add device”:
- Wait a few more moments as sometimes detection can take time.
- Click on the link that says “The printer that I want isn’t listed” (Windows 10) or “Add manually” (you might see this if the automatic search fails in Windows 11, or you might need to scroll down to find a similar option).
- This will open a dialog box with several options:
- “My printer is a little older. Help me find it.” (Windows will perform a more thorough search).
- “Select a shared printer by name” (If the printer is shared from another computer).
- “Add a printer using an IP address or hostname”: If you know your printer’s IP address, you can use this. You can usually find the printer’s IP address by printing a network configuration page from the printer itself.
- “Add a Bluetooth, wireless or network discoverable printer”: Another attempt to find it wirelessly.
- “Add a local printer or network printer with manual settings”: Usually for wired printers, but can sometimes be used with specific port configurations.
- Choose the most appropriate option and follow the subsequent steps. For most wireless printers that are on the network but not detected, adding by IP address is often a reliable fallback.
Troubleshooting Common Wireless Printer Connection Issues
Even with an easy setup process, you might encounter some hiccups.
Printer Not Found
- Ensure the printer is powered on and connected to the same Wi-Fi network as your PC.
- Check your printer’s display for any error messages or Wi-Fi connection status.
- Restart your printer, your PC, and your Wi-Fi router.
- Temporarily disable your firewall to see if it’s blocking discovery, then re-enable it and add an exception for your printer if necessary.
Connection Errors
- Double-check the Wi-Fi password entered on the printer.
- Ensure your router’s firmware is up to date.
- The printer might be too far from the Wi-Fi router, resulting in a weak signal.
Printing is Slow or Fails
- Update your printer drivers from the manufacturer’s website.
- Check for interference from other wireless devices.
- Restart the print spooler service on your Windows PC (search for “Services”, find “Print Spooler”, right-click, and select “Restart”).
Tips for a Smooth Wireless Printing Experience
Keep Printer Drivers Updated
Manufacturers regularly release driver updates to improve performance, fix bugs, and add new features.
Ensure a Stable Wi-Fi Signal
Place your printer and PC within a good range of your Wi-Fi router. Avoid obstructions that can weaken the signal.
Restart Devices
If you encounter printing problems, a simple restart of your printer and computer can often resolve them.
Conclusion
With a little preparation and by following the steps in Windows Settings, you can Connect a wireless printer easily windows. This setup will provide you with the freedom and flexibility to print from virtually anywhere in your network, streamlining your workflow and decluttering your workspace. If you encounter issues, the troubleshooting steps should help you get back on track.